Mobile Go Live
Camera sources, overlays, and streaming with the StreamSponsor app.
Direct link: https://streamsponsor.app/help/go-live-mobile
StreamSponsor Go Live combines a camera source with your dashboard overlay and broadcasts the finished video. A supported phone can work as a standalone camera and broadcaster using its built-in camera and microphone, with live overlays included—no external camera or computer required for this setup.
Build your overlay in the dashboard using the widgets available on your plan. Go Live loads it into your broadcast automatically. You can also use the same overlay in OBS, Streamlabs, CameraFi, or another compatible studio via its Browser Source URL.
What you'll need
- A StreamSponsor account with a plan that includes Go Live (free plans see a locked Go Live button with an upgrade prompt). GPS tracking is also plan-gated. Plan changes take effect in the app right away — it re-checks your plan before every stream start.
- You must be signed in — the Log In button on the Go Live tab takes you straight to the sign-in page.
- A camera source:
- the phone's built-in cameras (back or front), or
- an action camera paired wirelessly (or any camera app with RTMP streaming), or
- a compatible network camera or encoder using the documented RTMP Receive or Pull route. Input support is not the same as outgoing broadcast-protocol support; see the network-camera guide. RTSP-only feeds are not supported directly.
- A stream key from each platform you want to broadcast to.
Choosing a camera source
Using a console as the main video? Read the console gameplay setup and troubleshooting guide. It covers supported iPad UVC capture and iPhone/iPad network-encoder routes, face-camera PiP, game audio, and HDMI passthrough.
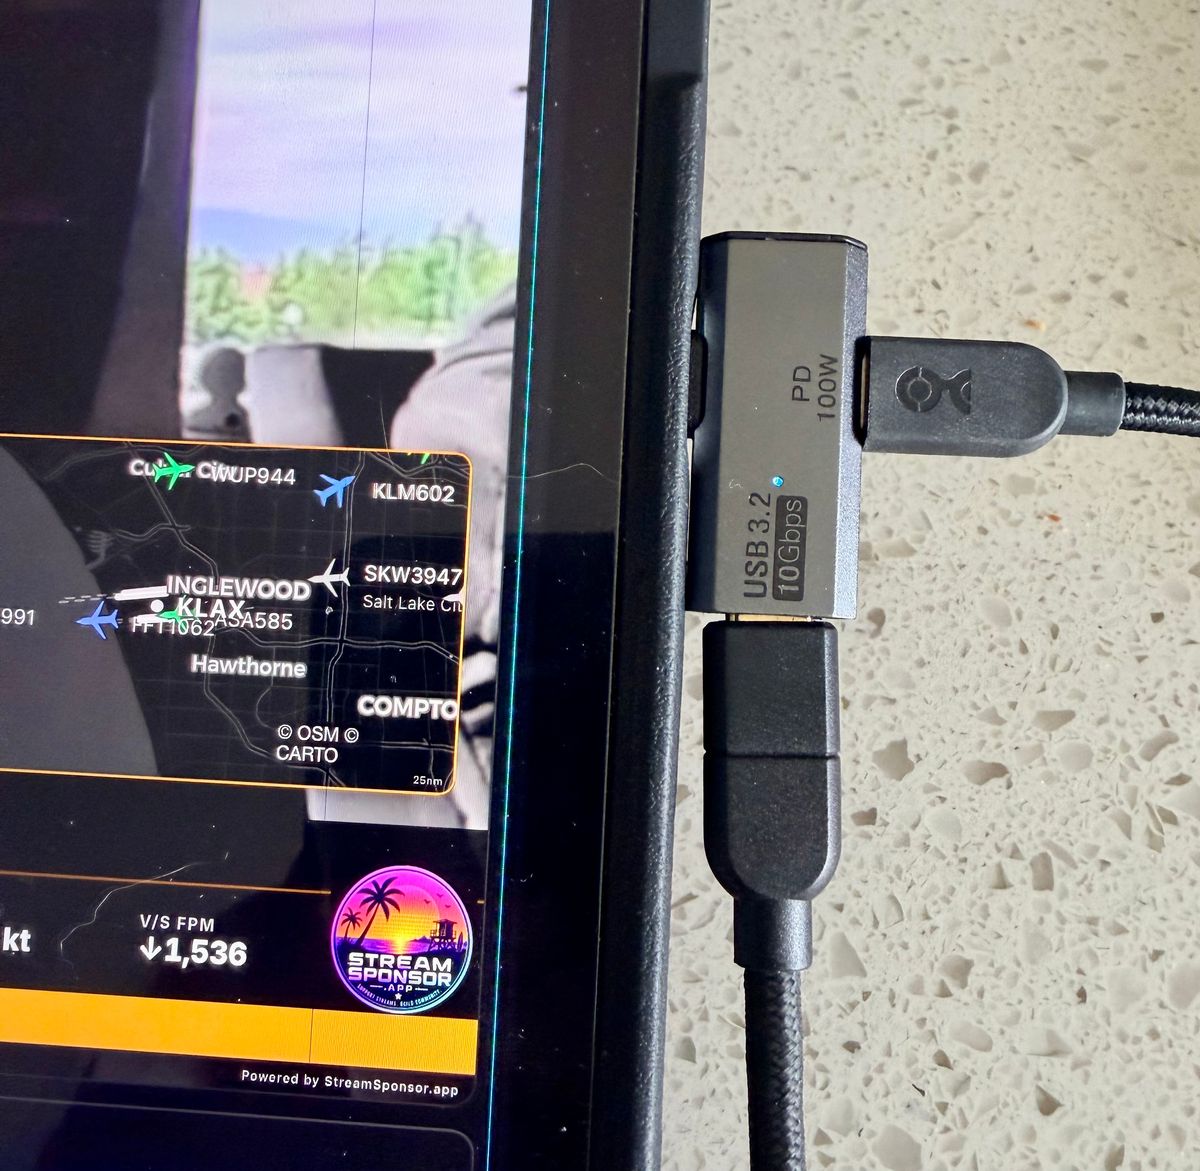
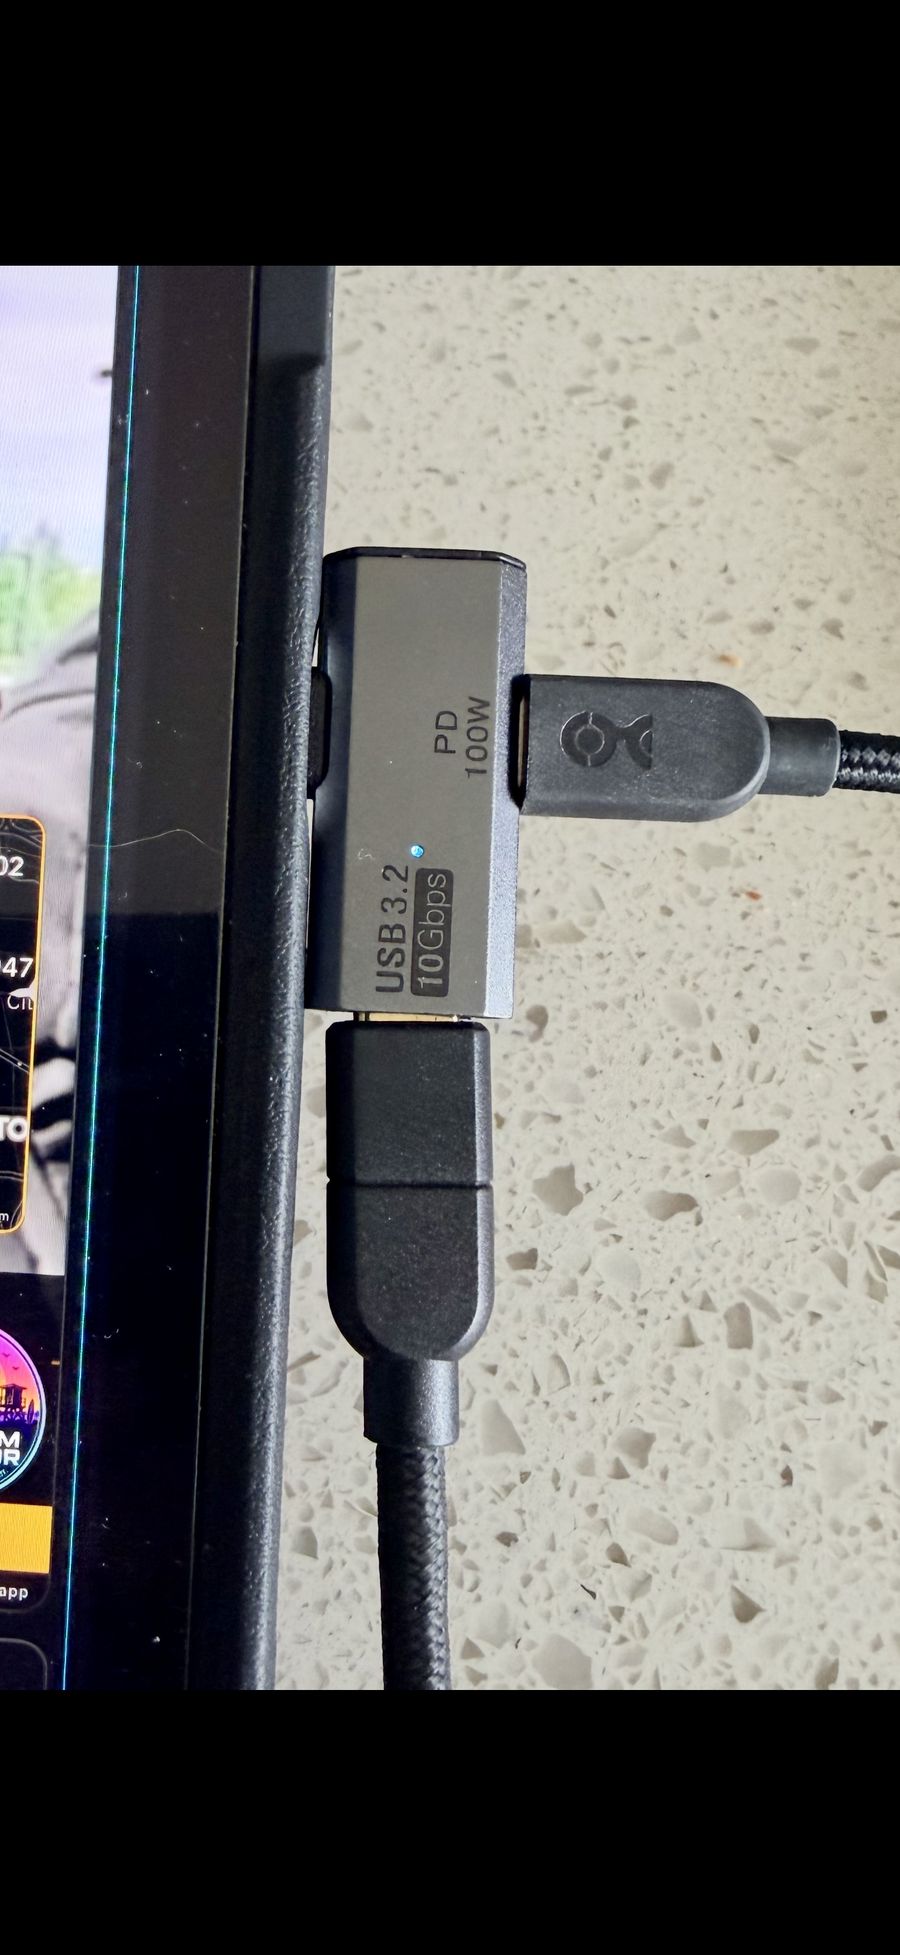
The Camera Source card lists every camera the app can see. External cameras connect wirelessly — iPhone doesn't support direct USB (UVC) video, so pairing happens over Wi-Fi. On iPad, USB capture cards work too: plug an HDMI camera into your iPad with a capture card (like the Elgato Cam Link 4K), and once it's connected it appears as a camera option in the Go Live camera menu (Apple only allows this on iPad, not iPhone). This also opens up wireless HDMI: pair an Accsoon CineView 4K receiver with your iPad's capture card, put the transmitter on your camera, and you're totally mobile — no laptop, no OBS. Streamers who relied on a laptop running OBS can get the same untethered experience from an iPad mini as from an iPhone. And for internet in the field, just run the iPad off your iPhone's Personal Hotspot — the whole rig (camera → CineView → iPad mini → hotspot) fits in a sling bag. Worried about power while capturing? A 100W USB-C "T" splitter adapter (all three connectors are USB-C) charges your iPad on one side and passes data on the other, so you can capture and charge at the same time — and if you want to stay mobile, it works just the same with a comparable portable power bank instead of a wall charger. Here it is in action — the iPad charging and receiving live video through the same port:
Tap Rescan if a camera you just paired doesn't appear. You can switch cameras mid-stream — the switch is seamless for viewers (no black frame or audio gap).
For network cameras, the app opens an ingest and shows "Waiting for video from camera…" until the first frames arrive. If the feed drops, the app auto-reconnects and falls back to the last working device camera if retries run out.
Landscape by default: the stream canvas is 16:9 landscape, matching the overlays you build on the dashboard. When using a built-in camera, hold the phone sideways to fill the frame — holding it upright shows the hint "Rotate your phone sideways for full-frame video." If you stream to TikTok, Reels, or Shorts, you can switch the canvas to portrait (9:16) mode instead.
GoPro live streaming
Stream straight from a GoPro HERO 8–13 or Mission 1 Pro — fully wireless, paired via QR codes, no typing. It's the flagship camera flow and has its own guide: GoPro live streaming.
Wi-Fi & network cameras
Network cameras work in two modes: Pull (the phone connects to a camera's rtmp:// address — PTZ and security cameras, encoders) and Receive (the camera pushes to the phone's address — GoPro, DJI, Insta360, drones). While pairing, the app shows a step timeline: listening → connected → receiving.
Full details, the RTMP URL format, and the RTSP workaround are in the Wi-Fi & network cameras guide. A Wi-Fi camera can also be used as a Picture-in-Picture inset.
While you're live
- Automatic quality adjustment: when your upload bandwidth dips, the app shows a "Network is struggling — quality reduced" banner and lowers the bitrate to keep the stream alive, restoring quality when the network recovers. That banner is a feature keeping you live, not an app fault — but if quality stays low the whole stream, the venue's upload bandwidth is the limit.
- Mute: a mute toggle appears at the top of the Go Live page (and in the fullscreen preview). Viewers hear silence while video continues, and a persistent banner reminds you while muted.
- Camera switching: change cameras mid-stream without dropping the broadcast.
Picture-in-Picture (dual camera)
Show a second camera as an inset over your main feed. In the Picture-in-Picture card, tap a source to turn the inset on and tap it again to turn it off — tap on, tap off. You can pick any listed source that isn't your main camera.
- Position & size: choose any of the four corners and three sizes (S / M / L).
- Swap: exchange the main and inset cameras mid-stream with one tap.
- Audio: the inset is video-only — audio always stays with the main source.
The second camera can be built-in, a wirelessly paired action cam, or a Wi-Fi camera. Your sponsor overlay always renders above the inset, so sponsors stay visible no matter where the inset sits.
Requires a phone that supports multi-cam; running the front and back cameras at the same time depends on the model.
Destinations and stream keys
Go Live can broadcast to up to 2 destinations at the same time — YouTube, Twitch, Facebook, TikTok, or a custom RTMP relay. Enter each platform's stream key once; keys are stored securely on the device (never on StreamSponsor's servers).
Where to find your stream key: YouTube — Studio → Go Live → Stream settings. Twitch — Creator Dashboard → Settings → Stream. Facebook — Live Producer → Streaming software. TikTok — LIVE Studio / server URL & key (requires LIVE access).
If one destination drops mid-stream, the other keeps going — and the app offers a one-tap reconnect for just the dropped one. Streaming to two destinations at once shows a one-time bandwidth advisory. If your whole connection drops, the app auto-retries, and a Reconnect button lets you rejoin manually, for example after a long phone call.
Your overlay
The program preview shows exactly what viewers see: your camera with your full StreamSponsor overlay — sponsor logos, scrollers/tickers, weather, maps, and widgets — composited on top, identical to what OBS users get via the browser-source URL. Pick which overlay to use from your account's overlay list. All overlay settings — scroller speed, size, rotation, position — are controlled from the dashboard on the website, not in the app; changes you make on the dashboard appear in the stream. See the Setup Guide for overlay configuration.
While an overlay is loading or being applied, the preview shows a "Preparing overlay" curtain instead of raw camera. That's intentional — viewers never see an overlay-less frame.
Preview and landscape mode
Rotate the phone to landscape and the preview snaps to full screen, letterboxed to the exact 16:9 program frame so you can judge overlay placement precisely. Tap the minimize button to return to the controls while staying in landscape.
Quality settings
Choose the outgoing resolution/bitrate/frame rate under video quality. If your connection can't sustain the chosen quality, the configurable fallback threshold (30 / 60 / 120 / 240 seconds) controls how long the app waits before adapting.
Permissions
- Camera & microphone are required for phone-camera streaming. If either is denied, the app shows a banner with a shortcut to Settings. Streams can run video-only ("audio off" notice) when only the mic is denied.
- Location is only requested when GPS tracking is enabled (paid plans) — it powers the live map overlay while you stream.
Live GPS on your overlay
Live GPS tracking can be started right from the Go Live tab (paid plans). While you're live with GPS tracking enabled, your phone's location feeds your overlay automatically — the StreamMap follows you in real time, the direction marker points where you're heading, and weather widgets update to wherever you are. Turn it on from the dashboard's Live GPS Tracking card (this also enables the map's live-position mode).
GPS sending uses an overlay write token from your Dashboard's overlay settings — the app picks it up automatically when you're signed in.
iOS location permission: the first time you enable GPS, iOS asks for location access. "While Using the App" keeps the map updating while the app is open on screen; "Always" lets tracking continue even when the phone is locked or you switch apps — the right choice for IRL streams where the phone rides in a pocket or mount. To change it later: iPhone Settings → StreamSponsor → Location.
Not using the app? The same card shows a Phone GPS Link — open it on any phone and it streams that phone's GPS to your overlay while the page stays open. Handy if you stream with a separate camera setup but still want the live map.
Getting help & diagnostic logs
The app's camera help sheet covers the common "no video" cases: wireless pairing not completing, both devices not being on the same Wi-Fi network, and camera output settings.
If a problem persists, send us your diagnostic log: from the Go Live page or the help sheet, tap "share diagnostic logs" — it exports a timestamped file (named like StreamSponsor-logs-2026-08-07_08-06.txt) via the iOS share sheet. Attach that file whenever you report an issue; it makes finding the cause dramatically faster.
Related guides
- GoPro live streaming — wireless QR-code pairing with GoPro Labs
- Wi-Fi & network cameras — Pull vs Receive, URL format, RTSP workaround
- Using OBS with StreamSponsor Mobile — send OBS's program output to the app as a camera
Troubleshooting
| Symptom | Fix |
|---|---|
| Go Live button locked | Your plan doesn't include Go Live — upgrade from the dashboard. |
| Camera not listed | Re-pair the camera, then tap Rescan. Make sure the camera and phone are on the same Wi-Fi network. |
| "Waiting for video from camera…" stays | Confirm the Wi-Fi camera is pushing to the RTMP URL shown in the app and both devices are on the same network. |
| A destination shows "dropped" | The app auto-reconnects; check that platform's stream key hasn't been reset. |
| No audio | Check the mic permission banner, or that the correct audio input is selected. If the mic is denied, the stream continues video-only with an "audio off" notice and a shortcut to iOS Settings. |
| Video doesn't fill the frame | The canvas is 16:9 landscape by default — hold the phone sideways when using a built-in camera, or switch to portrait (9:16) mode for TikTok/Reels/Shorts. |
| GoPro won't connect | Make sure both devices are on the same Wi-Fi network. After a GoPro firmware update, re-flash the GoPro Labs firmware — that resolves most "incompatible" symptoms. |
| "Network is struggling — quality reduced" banner | Expected on weak connections — the app lowers bitrate to keep the stream alive and restores quality when your network recovers. |
| Picture-in-Picture won't turn on | Your phone may not support running two cameras at once (front + back together depends on the model). Try a wireless action cam or network camera as the second source. |